Avirato/SIGA Connection Guide
Avirato and SIGA have partnered to provide the necessary integration with Portuguese Immigration Services.
Summary
- Website: https://siga.center
- App Permissions: Reads reservation, guest and property information
- Features:
- Property owners can configure SIGA automatically by retrieving their property info and then import all reservations.
- With regular usage, a one-time authentication is needed to link between SIGA and Avirato
- SIGA will process the guest details and send the data to the immigration services (SEF in Portugal). This can be done manually with a
quick click of a button, or even configured for automatic submission
- SIGA can also be used so that you grant access to service users for specific tasks such as sending the immigration data, accounting or
performing checkins/out, cleaning and transfers.
- SIGA can also process invoicing by generating the invoices from the reservation info. This easens the whole process of your accounting.
Support
Partnerships (Avirato Users) support team: mail@siga.center
Connection Guide
For any additional questions about connecting to SIGA, please contact the
SIGA support team.
Step 1: Signup For A SIGA Account
To connect your Avirato account with SIGA, you must have an account created. Go to SIGA website
and choose "Register" at the top. You will receive an email to activate your account by clicking on the indicated link.
You will then be able to log in using your registered email address as username and the chosen password.
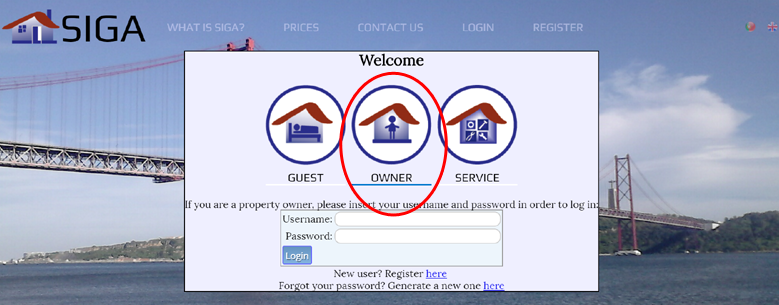
Step 2: Login to SIGA
Once you have a SIGA account, you can move on to connecting to Avirato. Choose the "Owner" section and log in as indicated.
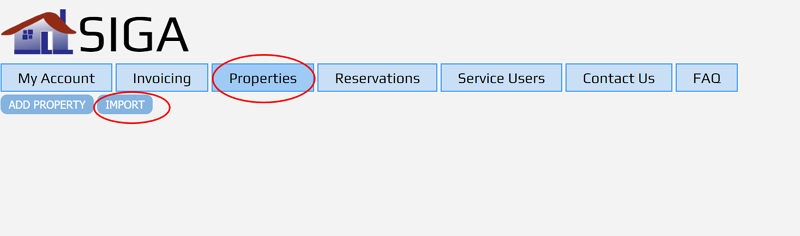
Step 3: Connect to Avirato and Import Property
The view after login is your main dashbord with several tabs. Click on the "Properties" tab and then on the "Import" button to import your property.
Choose "Avirato" on the next screen and type in your API key if you know it or your Avirato username and password and click "Import properties".
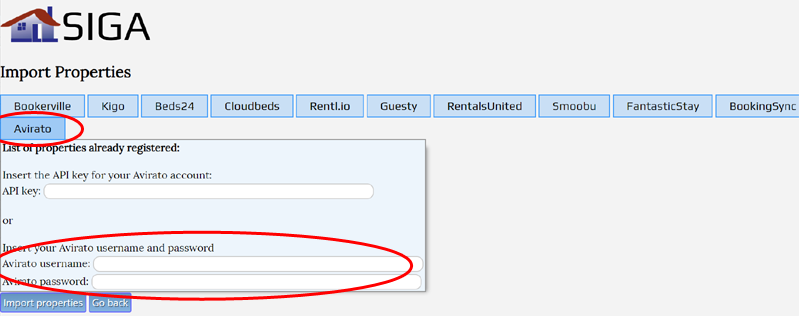
SIGA will then configure the connection and import the properties for you. By clicking on "Properties" again you will now
see your property listed. Click anywhere on that line and complete configuration for your property.
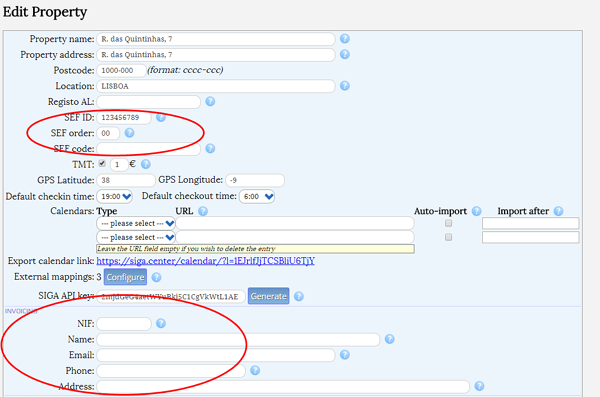
The following information needs to be filled in:
- SEF ID: this is your invoice number normally
- SEF order: this is typically "00" or the sequence number within the SEF registration
- SEF code: your SEF password, typically 12 digits
If you will be using SIGA for invoicing, you will need to fill in the fields in the "Invoicing section".
Step 4: Importing Reservations
After the property has been fully configured you can start importing your reservations. Choose the "Reservations" tab and then click "Import".
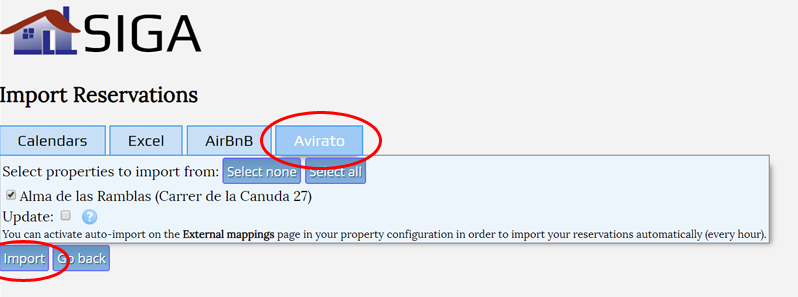
Once
again choose the "Avirato" tab and then "Import selected properties". SIGA will then connect to Avirato and download all the reservations
that are active. Importing of reservations can be configured to be automatic if you go back to the property configuration and choose
"External mappings: configure" and activate the "Auto-import" checkbox.
Step 5: Confirm and Send Immigration Form
Once the reservations have been imported they will remain with SIGA. However, you will probably be updating the guest data in SIGA. Before
submitting to the Immigration Services, you need to fill in the necessary immigration information on the right side of the reservation.
Click on the desired reservation in the list and the reservation details will be shown.
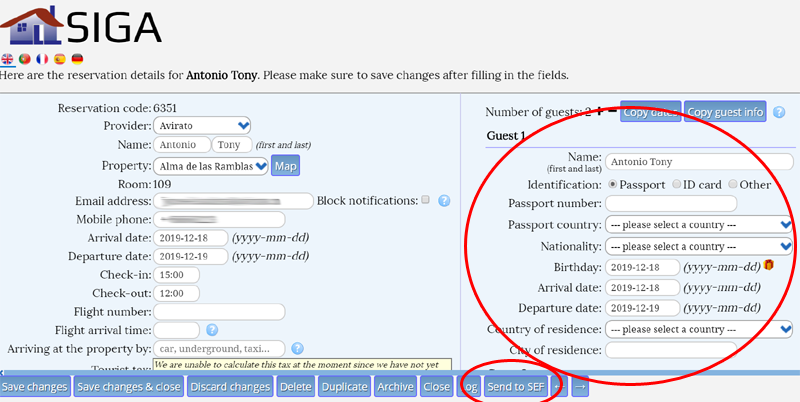
The screen is divided into two sides. The left side, which contains reservation details and the right side, which contains the guest details.
Confirm that they are correct and then click on "Send to SEF" at the bottom to initiate the process of sending to the Immigration Services.
After sending, an error may show up in case something went wrong or there are missing or incorrect fields filled in. Sending to SEF can also be
configured to be automatic. In this case, SIGA will send the immigration details on the day after the guests around, at the time you indicate.
This is to make sure that you have enough time to confirm that the guests have in fact been checked in and that the data can be sent, safely.
HomeIT
To integrate your HomeIT account, access your property's configuration and head down to the HomeIT section
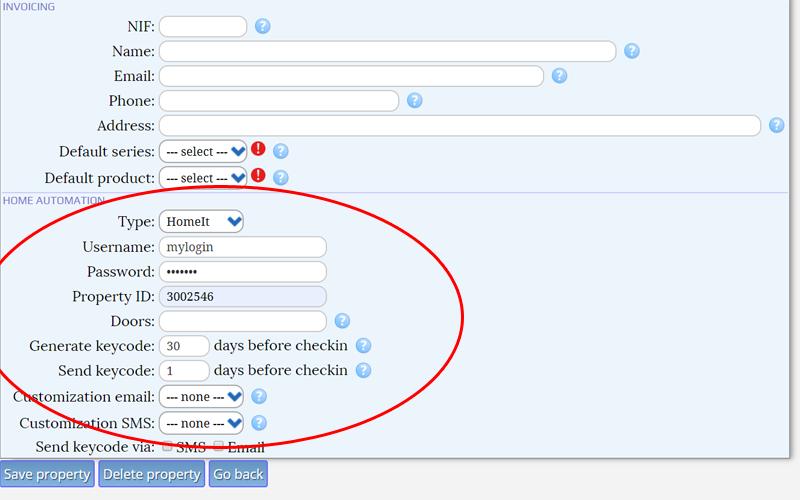 Username and password are your HomeIT's user and password. Property ID is the numeric id of your property and normally starts with 300.
If you needs keys for specific doors (different rooms) then indicate which doors are to be used in "Doors". This is a comma separated entry.
Under "Generate keycode" indicate how many days before checkin should the HomeIT keycode be created. Also, under "Send keycode" specify how many
days before checkin should it be sent to the customer by email or phone.
Username and password are your HomeIT's user and password. Property ID is the numeric id of your property and normally starts with 300.
If you needs keys for specific doors (different rooms) then indicate which doors are to be used in "Doors". This is a comma separated entry.
Under "Generate keycode" indicate how many days before checkin should the HomeIT keycode be created. Also, under "Send keycode" specify how many
days before checkin should it be sent to the customer by email or phone.
Customization email and SMS are the customizations you can configure when sending the keycodes. Please refer to the
SIGA manual for more information.